|
St Francis |
|

| Ground Tackle | Stern Anchor Line Reel | |
|
Wireless Windlass Remote
|
Under Construction - Last Updated: 31 March 2020
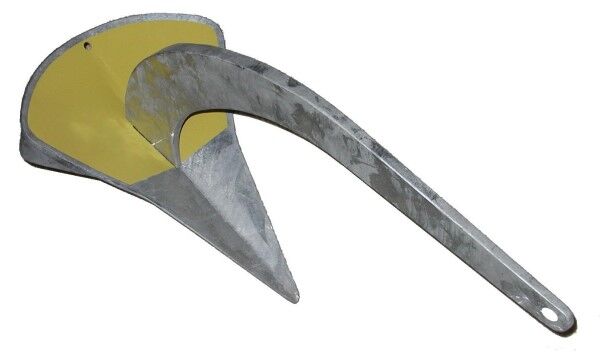
My current primary anchor is a SeaTech Spade, with a Danforth HT, a Mantus, and a Fortress on standby as spares and multiple anchors for major storm situations.
I started out on my first major cruise in the Caribbean with a Delta 55 anchor and later upgraded to a Delta 88. And in 2013, finally settled on one of the modern scoop anchors, a 99-pound Spade S180. When we sold our heavy monohull in 2015, I opted to keep the Spade anchor and the 300 feet of G4 chain.
See my presentation on "Modern Anchors and Ground Tackle" for my ideas on selecting the appropriate anchor, chain, shackles, and swivels for your boat.
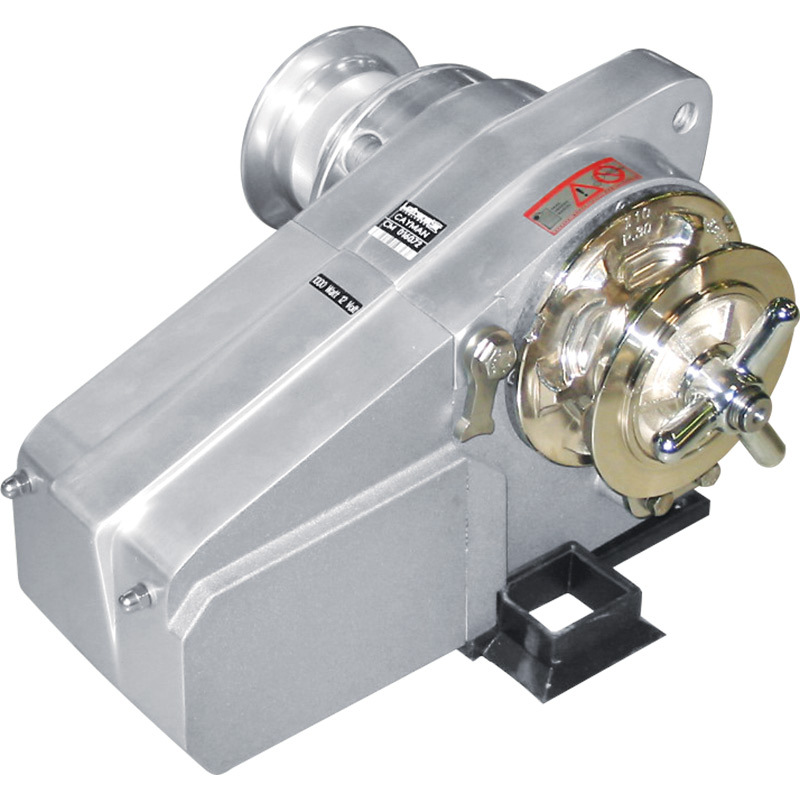
Windlass: I loved my Lofrans Tigress windlass on the CSY. The new cat came with a Lofrans Cayman 88, which is the newest model in the Lofrans Horizontal Windlass Line. I considered swapping windlasses before selling the CSY, but stuck with the Cayman 88, and it is of similar design and quality as the Tigress.
For snubbers I have an assortment of all 5/8" lengths of 3 strand nylon in lengths of 10-35'. With a catamaran, our snubber attaches to each bow cleat.
Chain: I replaced the chain on my CSY in 2006 with 300' of new 3/8" HT ACCO chain. From the start, I was in the habit of end-for-ending and remarking the chain about every year and a half when I was at a dock. I have now had the chain re-galvanized a couple of times over the past 13 years, and it is still in very good shape (as of 2019). I opted to bring my anchors and chain with me from the CSY. The 100 lb Spade is a bit of overkill on the much lighter catamaran, but overkill is good in a storm.
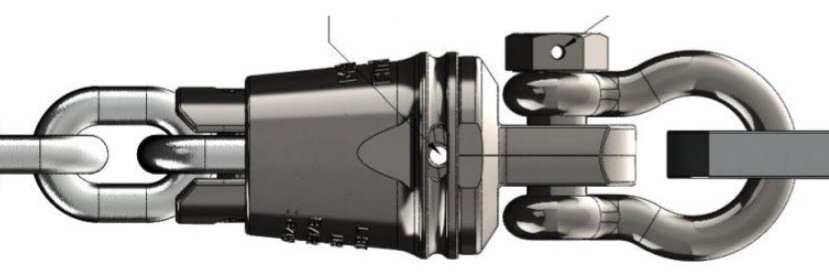
Anchor Swivels: I don't think that having a swivel
will help those that are having a problem with their anchors dislodging
in changing winds. I think that would be more a problem with the anchor type
vs. the bottom and/or the setting technique.
Why have a swivel? As the wind picked up one night at anchor I
went forward to let out a little more chain and the twists jammed in the
chain pipe below the windlass. I realized then that if this had been a
really serious situation and I had had to let out more chain or dump the
chain/anchor completely to
save the boat, I would have been in trouble. So I started looking hard for a
swivel that would help keep the chain from developing twists, without adding
a weak link to my ground tackle.
Many quality swivels and shackles you could buy are only rated for the BBB
chain, and if used with HT chain become a very weak link. That problem,
severe corrosion, improper rigging and lack of mousing were problems with
many of the boats that have reportedly lost their anchors due to problems
with swivels or shackles.
I had resigned myself to put up with the chain twist until a very
experienced friend with a similar boat and ground tackle came across what
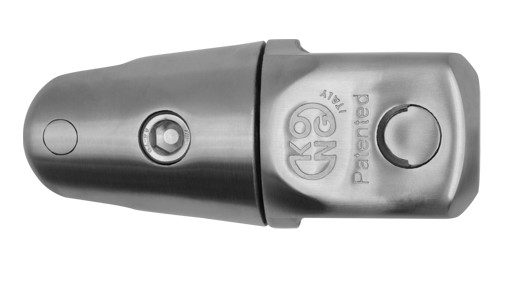
looked to be a proper swivel. The engineered swivels we bought about a year
ago through West Marine (special order) are made in Italy by a very old
company making nautical fittings. It is very high quality, 316 SS, tested
and patented. It comes in 3 sizes and mine has a working strength of 6600
lbs and a breaking strength of 21000 lbs. On the instruction sheet is
printed "KONG, Bonoiti, since 1830, INOX AISI 316 Swivel Anchor Connector".
Cost was about $130. I still use the same two shackles to make the
connection between chain, swivel and anchor. The KONG swivel is made so that
it can be taken apart and examined to look for signs of weakness.
In 2019, I bought a new Mantus S3 Swivel with
integrated shackles. It is designed so that there is little
possibility of "side loading" that could lead to failure.
See
Dave's
2013 SSCA Presentation on Modern Anchors and Ground Tackle for all
Dave's research on anchors.
This line reel is made of
two plastic ends from a West Marine spool of line, a PVC inner tube
about 20" long, some
1/4" allthread and nuts to hold it all together. It holds 500' of 5/8"
polyester double braided line.
 The line can be used for many things including running out a kedge anchor, towing a drogue, tying a long line to shore and as a messenger for a heavier towing line. The reel mounts ready for action but out of the way on the stern rail. It has a Sunbrella cover to protect it from the sun. |
Proper Hook-ups for Mooring Lines
There are lots of
ways to do connect your boat to a mooring. Some ways work better than
others. But if you are using one line run from one side of your boat through
the mooring buoy eye and then back to the other side of your boat you will
certainly chafe through. The problem is the yaw causing the sawing action on
the lines. It is a common mistake and we have seen several boats lost in the
Pacific because of this!.
For reasonable wind/wave conditions you are much better off using a hard eye
on the buoy end of the line and then a large full strength shackle to make
the connection to the buoy line eye. Another way is to use a bridle with two
separate lines and good chafe protection to the boat.
You also have to watch for chafe on the anchor(s) hanging off
your bow, as explained in great detail on this website:
http://www.pbase.com/mainecruising/mooring_prep
Storm conditions are a real problem because of chafe and heat as the lines
work. So in crowded harbors we use a 7' length of 3/8" G4 chain over our bow
roller to ensure no chafe from the boat. The buoy end is connected using a
7/16" G4 shackle to the chain and then a 5/8" shackle to the buoy. These
sizes give no weak links. On the boat I have the chain connected using the
same size shackles to multiple strong points on the boat's foredeck (we have
six available) using 5/8" polyester/dacron double braid line to minimize
stretch.
You have to minimize chafe in multiple locations so chafe protection is very important. But. tight heavy chafe gear will increase heat/melting of stretchy nylon lines during heavy surging. So I like G4 chain, full strength shackles and equal strength low stretch polyester line rigged to multiple strong points on the bow.
Inexpensive Wireless Windlass Remote
In November 2012, Dave helped our friend Jack on s/v Kitty Hawk move his boat from a mooring to a dock. Jack had this nifty little windlass remote. We ended up buying not one but two (you always need a spare, and the price was right). We bought ours on eBay for only $40 for two, including shipping!! They are cheaply made, but do the job, and we have a second for backup. (Note, you need a special A23 battery not commonly found, so make sure you get a battery too).
We have since installed it on our windlass--the installation took about 10 minutes to wire the remote's "sender" across the electrical terminals below decks. It works really well, except for a slight lag, which you get used to.
We keep our remote in a ziplock, as it is definitely not waterproof.
Here's a link to purchase one on Amazon.com
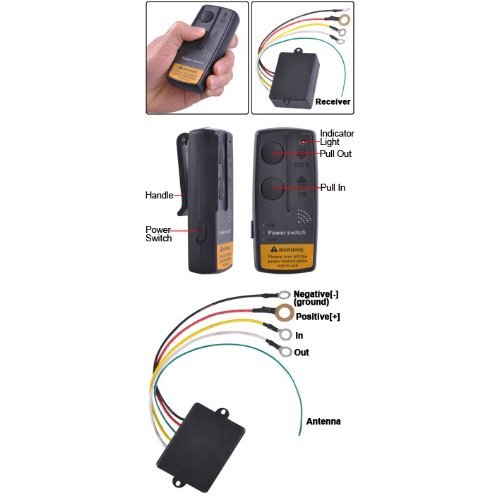
These are made in China, and do not have any safety interlocks on them. Use carefully!! The actuator is wired across your existing windlass solenoid.
(top)